Hello, nice to meet you. I am Johnny.
I am writing to provide information from the point of interface (UI) designer. Below are some helpful tips for when buying a camera.
When you buy a camera, the first thing you would probably do is turn the power on. When you buy new stuff, discovering what you can do or what you will experience is the fun part, yet recent cameras became very versatile, which means you may not need every feature. (I agree that for some of you the features might not be enough) As a developer, my goal is to develop a camera that provided a comfortable shooting experience for all users. Still, on the other hand, the camera operation may become complicated by incorporating many functions.
When you see PENTAX’s camera screen, many “hints” are hidden to give easy access to change settings eliminating such dilemmas.
I would like to tell you how to view the PENTAX screen from the user interface designer’s point of view. You might discover something new with the screen function.
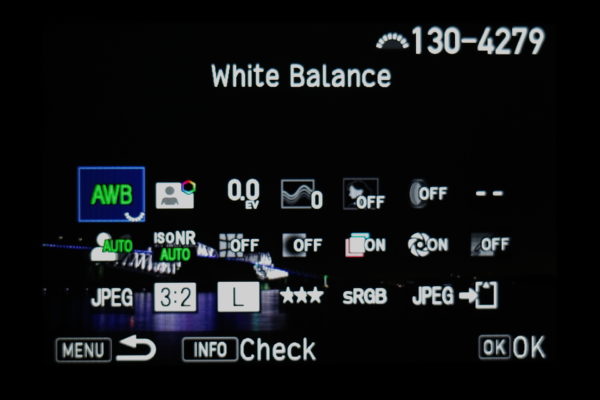
White Balance Setting Screen
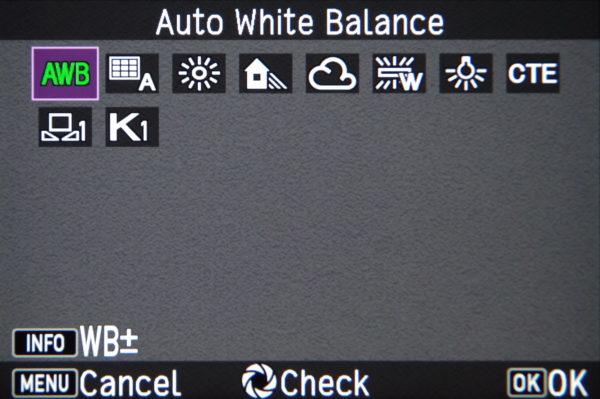
PENTAX KP White Balance setting screen
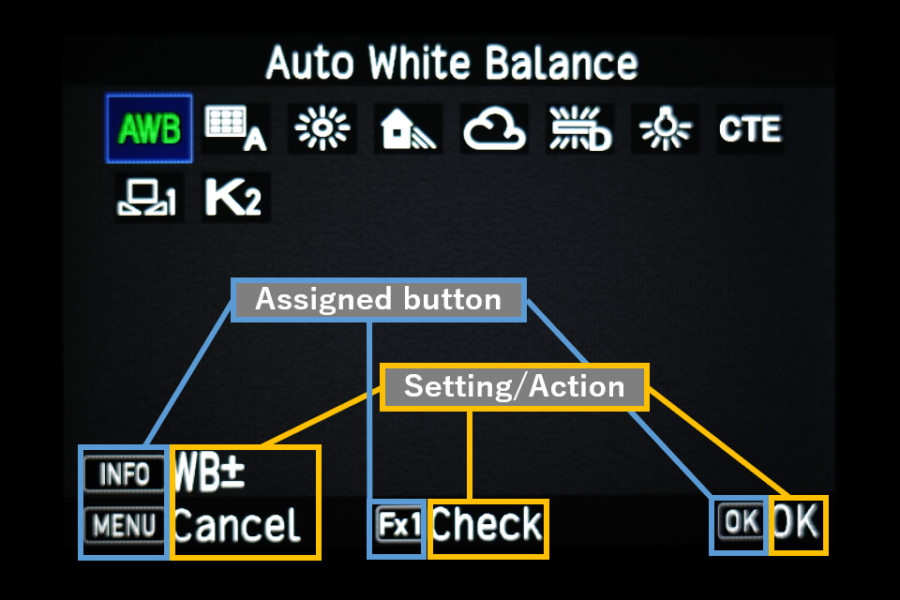
The blue frame on the left side of the set of the guide indicates the assigned button for operation, and the orange frame on the right side is about setting or action when you push the button.
When you are in the white balance setting screen, “WB ±” is displayed to the right of the INFO button. When you push the INFO button, the adjustment screen is displayed. Try and see how the adjustment screen looks.
“Cancel” on the MENU button and “OK” on the OK button are the standard settings on various screens, indicating whether to cancel the changed setting value and go back to the original setting value or to accept the changed setting value. Even if you exit the setting screen by pressing the shutter button or AF button except for the OK button, the setting is saved. (Except for some language settings and date/time settings)
By pushing the Fx1 button “Confirm,” the preview image will be displayed at the background of the white balance setting screen. With this, the adjustment change is noticeable in the picture before you finalize it. In the PENTAX KP, “Confirm” is assigned on the Fx1 button, but in the high-grade models PENTAX K-1 and PENTAX K-3, the preview position placed on the power lever OFF / ON will be used for “Confirm.”
PENTAX K-1 series White Balance setting screen
Control Panel
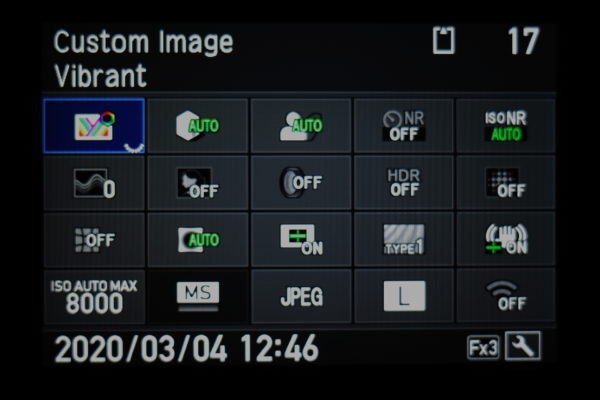
PENTAX KP Control Panel
This screen is displayed when the INFO button is pressed after starting the camera. On this screen, as many items are displayed, there may be items that you will not recognize. When you look closely, a guide for the Fx3 button and a spanner mark are displayed in the lower right. What does this spanner mark do? Well, the function to customize the control panel items are located here. The control panel can be customized with PENTAX K-1 Mark II, PENTAX K-1, PENTAX KP, and PENTAX K-7. Start using it by registering your frequently used functions.

PENTAX KP Control Panel Screen for selecting a panel to customize (the screen where the Fx3 button is pressed on the control panel)
If you would like to reset the customized control panel settings to default, you can reset by turning on the camera → INFO button → Green button.
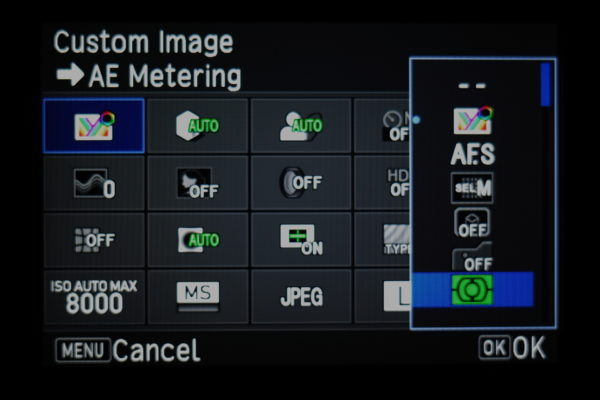
PENTAX KP’s screen for selecting the function to be registered in the Control Panel
With PENTAX KP only, there is a hidden feature in which the guide is not displayed on the control panel screen. When you are selecting the item during control panel customization, page feed is possible with the front e-dial.
Custom Function Setting Screen
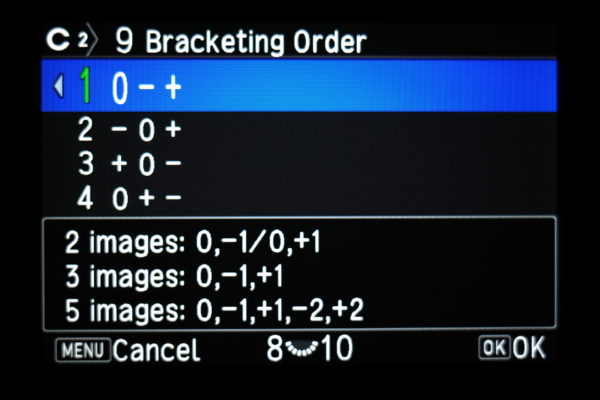
PENTAX KP Custom Function setting screen
Here, we will introduce some examples of the guide display.
In the middle of the screen, there is a guide display with “8” [semicircle] “10”. Among our development team, this [semicircle] is familiar with various nicknames such as gyoza, eyelashes, etc., but it indicates the front and rear e-dials of the camera. The icon in this image is the rear e-dial. On the top of the screen, it says “9 Bracketing Order”. Number “9” is the custom image number, so when you turn the rear e-dial to the left, the screen will move to 8th custom function. When it is turned to the right, the screen will move to the 10th custom function. PENTAX K-3 was the first model featuring the custom function switching using e-dial.
Similarly, with the Custom Image settings can be changed with e-dial. With Custom Image, with the rear e-dial, sharpness can be adjusted, and when you use the front e-dial, you can change the mode of Contrast. In addition to the guide display, explanation text can be displayed in some of the features.
Menu

The guide display at the lower right of the screen, the [semicircle] icon on the left shows the rear e-dial as in the custom function, but the icon on the right shows page feed. This means that you do not need to move the cursor to the top tab with the cross key instead the page feed can be done instantly by turning the rear e-dial.
It is not on the guide, but the front e-dial becomes active at the menu screen. With the front e-dial, you can jump to the first page of each tab including still image menu, movie menu, playback menu, set-up menu, and Custom Setting menu.
For example, if you want to display the Button Customization on the 5th page of a still image tab, you can quickly reach the target settings by following the below order.
①Select movie menu with the front e-dial
②With the rear e-dial turn left to feed one page
③ Select Button Customization using the up and down buttons
RAW Development Screen
RAW Development screen
So far, we have explained the guide displayed at the bottom of the screen, but let’s focus on the guide display at the top right in the RAW development screen.
The [semicircle] icon on the left is the front e-dial. The right side shows the folder number and file number, which means that it is possible to switch images with the front e-dial during one image RAW development. If you want to change the RAW developing image, you can switch to the previous or next RAW image using the front e-dial. However, be aware that when you switch images, the setting value returns to the shooting information of the changed RAW image.
Also, an INFO button and “Confirm” are displayed at the bottom of the screen. This is a function that temporarily hides the icon or text, which will be bothersome when checking the image during RAW development. While the INFO button is pressed, you can check the image firmly by displaying the image-only on the screen, as shown below.

RAW Development screen (during the INFO button pressed)
Multi-playback screen
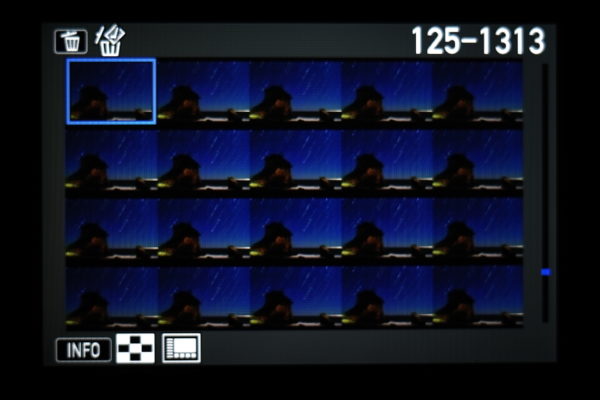
PENTAX KP Multi-playback screen
Lastly, I would like to introduce muli-playback, which is the function even some of our staff didn’t know.
The icon to the right of the INFO button is a guide to switch the number of thumbnails that can be displayed at once. The default is 20 images, but you can choose from 6, 12, 20, 35, and 80. Thumbnails with small size images become effective when finding a target image based on the atmosphere and color of the shooting situation.
On the playback screen, there is a guide not only at the bottom, as well.
The delete button is positioned at the top left of the screen. This enables the function to delete the image selected on the multi playback screen.
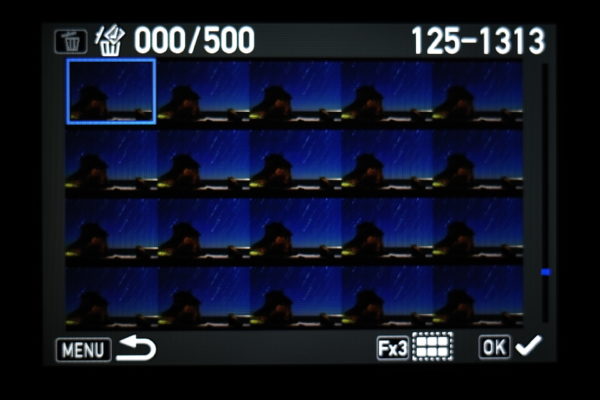
PENTAX KP Multi-playback image delete selection screen
You can select images to delete from the multi-playback screen thumbnail and delete them all at once. On the image delete selection screen, use the OK button to select the image you want to delete. You can also choose the range of images at once with the Fx3 button. If you select at least one image, the delete button in the upper left will change from gray to white, press the delete button to delete.
I am happy to have been able to explain the many ways you can read and understand the guide displayed on the camera screen. Some of these features may not have been known by many of you so I hope that you will now be able to use these functions to help simplify your camera operations. You may discover a new way to use the screen that you may not have thought of using! Good luck and have fun!